Category

Automation

Category

Introduction

When working with Python and Jinja, understanding the nuances of single quotes (”) and double quotes (“”) can help you write cleaner and more maintainable code. In this article, we’ll explore the differences between single and double quotes in Python and Jinja, along with best practices for using them effectively.

Single Quotes vs. Double Quotes in Python

In Python, both single and double quotes can be used to define string literals. For instance:


single_quoted = 'Hello, World!'
double_quoted = "Hello, World!"

There’s no functional difference between these two styles when defining strings in Python. However, there are considerations when you need to include quotes within a string. You can either escape them or use the opposite type of quotes:


string_with_quotes = 'This is a "quoted" string'
string_with_escapes = "This is a \"quoted\" string"

The choice between single and double quotes in Python often comes down to personal preference and code consistency within your project.

Single Quotes vs. Double Quotes in Jinja

Jinja is a popular templating engine used in web development, often with Python-based frameworks like Flask. Similar to Python, Jinja allows the use of both single and double quotes for defining strings. For example:


<p>{{ "Hello, World!" }}</p>
<p>{{ 'Hello, World!' }}</p>

In Jinja, when you’re interpolating variables using double curly braces ({{ }}), it’s a good practice to use single quotes for string literals if you need to include double quotes within the string:


<p>{{ 'This is a "quoted" string' }}</p>

This practice can make your Jinja templates cleaner and easier to read.

Best Practices

Here are some best practices for choosing between single and double quotes in Python and Jinja:

  1. Consistency: Maintain consistency within your codebase. Choose one style (single or double quotes) and stick with it. Consistency enhances code readability.
  2. Escape When Necessary: In Python, escape quotes within strings using a backslash (\) or use the opposite type of quotes. In Jinja, use single quotes when interpolating strings with double quotes.
  3. Consider Project Guidelines: Follow any guidelines or coding standards set by your project or team. Consistency across the entire project is crucial.

Conclusion

In both Python and Jinja, single and double quotes can be used interchangeably for defining string literals. While there are subtle differences and conventions to consider, the choice between them often depends on personal preference and project consistency. By following best practices and understanding when to use each type of quote, you can write cleaner and more readable code.

Remember, whether you prefer single quotes or double quotes, the most important thing is to be consistent within your project.

Python is a powerful and versatile language that supports various data structures, including lists, tuples, and dictionaries. Dictionaries are an essential component of the language, as they allow us to store data in a key-value pair. Nested dictionaries are dictionaries that have other dictionaries as values, making them a valuable tool for handling complex data structures. In this article, we will explore advanced techniques for handling nested dictionaries in Python 3.

Introduction

Nested dictionaries can be challenging to handle, as they can have multiple layers of nesting. In this article, we will discuss techniques for creating, accessing, and manipulating nested dictionaries.

Creating a Nested Dictionary

To create a nested dictionary, we can use the same syntax as creating a regular dictionary. The only difference is that we need to specify another dictionary as the value for a key. Here is an example:

nested_dict = {
'key1': 'value1',
'key2': {
'key3': 'value3',
'key4': 'value4'
}
}

In the example above, nested_dict is a nested dictionary that has a single key-value pair, where the value is another dictionary.

Accessing Values in a Nested Dictionary

To access values in a nested dictionary, we can use the bracket notation, just like with regular dictionaries. The only difference is that we need to specify the keys for each nested dictionary. Here is an example:

print(nested_dict['key2']['key3']) # Output: 'value3'

In the example above, we are accessing the value of key3 in the nested dictionary that is the value of key2 in the nested_dict dictionary.

Modifying Values in a Nested Dictionary

To modify values in a nested dictionary, we can use the bracket notation, just like with regular dictionaries. The only difference is that we need to specify the keys for each nested dictionary. Here is an example:

nested_dict['key2']['key3'] = 'new_value'
print(nested_dict) # Output: {'key1': 'value1', 'key2': {'key3': 'new_value', 'key4': 'value4'}}

In the example above, we are modifying the value of key3 in the nested dictionary that is the value of key2 in the nested_dict dictionary.

Adding Keys and Values to a Nested Dictionary

To add keys and values to a nested dictionary, we can use the bracket notation, just like with regular dictionaries. The only difference is that we need to specify the keys for each nested dictionary. Here is an example:

nested_dict['key2']['key5'] = 'value5'
print(nested_dict) # Output: {'key1': 'value1', 'key2': {'key3': 'new_value', 'key4': 'value4', 'key5': 'value5'}}

In the example above, we are adding a new key-value pair, key5 and value5, to the nested dictionary that is the value of key2 in the nested_dict dictionary.

Deleting Keys and Values from a Nested Dictionary

To delete keys and values from a nested dictionary, we can use the del keyword, just like with regular dictionaries. The only difference is that we need to specify the keys for each nested dictionary. Here is an example:

del nested_dict['key2']['key5']
print(nested_dict) # Output: {'key1': 'value1', 'key2': {'key3': 'new_value', 'key4': 'value4'}}


Python is a powerful and flexible programming language that makes it easy to work with nested lists. Whether you’re dealing with a small list or a large and complex one, Python provides many built-in functions and methods that can help you manipulate and extract data from nested lists. In this article, we’ll explore some advanced techniques for handling nested lists in Python 3.

What Are Nested Lists?

A nested list is a list that contains other lists. These lists can be of different sizes, and they can be nested to any depth. For example, consider the following nested list:

my_list = [[1, 2, 3], [4, 5, 6], [7, 8, 9]]

This list contains three inner lists, each of which contains three integers. We can access the elements of this list using indexing, as shown below:

print(my_list[0][1]) # Output: 2

This will print the second element of the first inner list.

Accessing Elements of Nested Lists

To access elements of nested lists, we can use the same indexing and slicing techniques that we use with regular lists. For example, to access the first element of the second inner list in my_list, we can use the following code:

print(my_list[1][0]) # Output: 4

We can also use slicing to extract a sub-list from a nested list. For example, to extract the first two elements of the first inner list in my_list, we can use the following code:

print(my_list[0][:2]) # Output: [1, 2]

Modifying Nested Lists

We can modify nested lists in much the same way that we modify regular lists. For example, to change the value of the first element of the second inner list in my_list, we can use the following code:

my_list[1][0] = 10
print(my_list) # Output: [[1, 2, 3], [10, 5, 6], [7, 8, 9]]

We can also append elements to a nested list using the append() method. For example, to append the value 10 to the third inner list in my_list, we can use the following code:

my_list[2].append(10)
print(my_list) # Output: [[1, 2, 3], [10, 5, 6], [7, 8, 9, 10]]

Flattening Nested Lists

Sometimes we may need to flatten a nested list, i.e., convert it into a one-dimensional list. We can do this using a technique called recursion. Recursion is a powerful programming technique that involves a function calling itself.

Here’s an example of a recursive function that flattens a nested list:

def flatten(nested_list):
flattened_list = []
for item in nested_list:
if isinstance(item, list):
flattened_list.extend(flatten(item))
else:
flattened_list.append(item)
return flattened_list
Here, the flatten() function takes a nested list as its argument and returns a flattened list. The function checks if each item in the list is itself a list, and if so, calls itself recursively to flatten that list. Otherwise, it appends the item to the flattened list.

Conclusion

In this article, we’ve explored some advanced techniques for handling nested lists in Python 3. We’ve seen how to access and modify elements of nested lists, as well as how to flatten a nested list using recursion. These techniques can be extremely useful when working with complex data structures in Python. Remember to always test your code thoroughly and experiment with different techniques to find the best approach for your specific needs.

FAQs

  1. What is a nested list in Python? A nested list is a list that contains other lists as its elements.
  2. How can I access elements of a nested list in Python? You can use indexing and slicing techniques to access elements of a nested list.
  3. How can I modify a nested list in Python? You can modify a nested list in Python using the same techniques that you use with regular lists, such as indexing and slicing.
  4. What is recursion in Python? Recursion is a programming technique in which a function calls itself in order to solve a problem.
  5. Can I use recursion to flatten a nested list in Python? Yes, you can use recursion to flatten a nested list in Python.

Meta Description: Want to become a Python 3 expert? Learn how to handle complex nested lists and dictionaries in Python 3 with our code examples and tips.

Introduction:

Python 3 is a popular programming language used for various applications, from web development to machine learning. Its simplicity, versatility, and easy-to-read syntax make it a favorite among developers.

However, when dealing with large datasets, handling nested lists and dictionaries can become a daunting task. If you’re struggling with these advanced data structures, don’t worry. In this article, we’ll provide you with the tools and techniques you need to handle advanced nested list and dictionary in Python 3.

What are Nested Lists and Dictionaries?

Before diving into the intricacies of advanced nested list and dictionary handling, let’s review what these data structures are.

Nested Lists: A list is a collection of items that are ordered and changeable. A nested list is a list that contains one or more lists as its elements.

For example:

my_list = [[1, 2, 3], [4, 5, 6], [7, 8, 9]]

Dictionaries: A dictionary is an unordered collection of items that are stored as key-value pairs. A nested dictionary is a dictionary that contains one or more dictionaries as its values.

For example:

my_dict = {'first': {'name': 'John', 'age': 25}, 'second': {'name': 'Jane', 'age': 30}}

Accessing Elements in Nested Lists and Dictionaries

Accessing elements in nested lists and dictionaries can be tricky, especially if you’re dealing with multiple layers of nesting.

To access an element in a nested list, you need to use multiple index operators. For example, to access the element “5” in the following nested list:

my_list = [[1, 2, 3], [4, 5, 6], [7, 8, 9]]

You would use the following code:

print(my_list[1][1])

Output: 5

To access an element in a nested dictionary, you also need to use multiple keys. For example, to access the value “25” in the following nested dictionary:

my_dict = {'first': {'name': 'John', 'age': 25}, 'second': {'name': 'Jane', 'age': 30}}

You would use the following code:

print(my_dict['first']['age'])

Output: 25

Adding Elements to Nested Lists and Dictionaries

To add elements to a nested list, you can use the append() method or the extend() method. The append() method adds a single element to the end of the list, while the extend() method adds multiple elements to the end of the list.

For example, to add the list [10, 11, 12] to the end of the following nested list:

my_list = [[1, 2, 3], [4, 5, 6], [7, 8, 9]]

You can use the extend() method:

my_list.extend([[10, 11, 12]])
print(my_list)

Output: [[1, 2, 3], [4, 5, 6], [7, 8, 9], [10, 11, 12]]

To add elements to a nested dictionary, you can simply assign a new key-value pair to the dictionary.

For example, to add the key-value pair {‘third’: {‘name’: ‘Bob’, ‘age’: 35}} to the following nested dictionary:

my_dict = {'first': {'name': 'John', 'age': 25}, 'second': {'name': 'Jane', 'age': 30}}

You can use the following code:

my_dict['third'] = {'name': 'Bob', 'age': 35}
print(my_dict)

Output: {'first': {'name': 'John', 'age': 25}, 'second': {'name': 'Jane', 'age': 30}, 'third': {'name': 'Bob', 'age': 35}}

Removing Elements from Nested Lists and Dictionaries

To remove elements from a nested list, you can use the remove() method or the pop() method. The remove() method removes the first occurrence of a specified element in the list, while the pop() method removes the element at the specified index.

For example, to remove the list [4, 5, 6] from the following nested list:

my_list = [[1, 2, 3], [4, 5, 6], [7, 8, 9]]

You can use the remove() method:

my_list.remove([4, 5, 6])
print(my_list)

Output: [[1, 2, 3], [7, 8, 9]]

To remove elements from a nested dictionary, you can use the del keyword or the pop() method. The del keyword removes the key-value pair with the specified key, while the pop() method removes the key-value pair at the specified key and returns its value.

For example, to remove the key-value pair with the key ‘second’ from the following nested dictionary:

my_dict = {'first': {'name': 'John', 'age': 25}, 'second': {'name': 'Jane', 'age': 30}}

You can use the del keyword:

del my_dict['second']
print(my_dict)

Output: {'first': {'name': 'John', 'age': 25}}

Modifying Elements in Nested Lists and Dictionaries

To modify an element in a nested list, you can simply assign a new value to the element using its index.

For example, to modify the element “5” to “50” in the following nested list:

my_list = [[1, 2, 3], [4, 5, 6], [7, 8, 9]]

You can use the following code:

my_list[1][1] = 50
print(my_list)

Output: [[1, 2, 3], [4, 50, 6], [7, 8, 9]]

To modify an element in a nested dictionary, you can simply assign a new value to the key using its key.

For example, to modify the value “30” to “35” in the following nested dictionary:

my_dict = {'first': {'name': 'John', 'age': 25}, 'second': {'name': 'Jane', 'age': 30}}

You can use the following code:

my_dict['second']['age'] = 35
print(my_dict)

Output: {'first': {'name': 'John', 'age': 25}, 'second': {'name': 'Jane', 'age': 35}}

Handling Advanced Nested List and Dictionary Operations

Now that we’ve covered the basics of accessing, adding, removing, and modifying elements in nested lists and dictionaries, let’s dive into some more advanced operations.

Flattening Nested Lists

Flattening a nested list means converting it to a single-level list. This is useful when you want to perform operations on all the elements in the list without having to worry about their nested structure.

To flatten a nested list, you can use a recursive function that checks whether each element is a list or not. If it is a list, the function calls itself on the element. If it is not a list, the function adds the element to a new list.

Here’s an example of a flatten function that flattens a nested list:

def flatten(nested_list):
flattened_list = []
for element in nested_list:
if type(element) == list:
flattened_list.extend(flatten(element))
else:
flattened_list.append(element)
return flattened_list

For example, to flatten the following nested list:

my_list = [[1, 2, [3]], [4, [5, 6]], 7]

You can use the flatten function:

flattened_list = flatten(my_list)
print(flattened_list)

Output: [1, 2, 3, 4, 5, 6, 7]

Merging Nested Dictionaries

Merging nested dictionaries means combining two or more dictionaries into a single dictionary. This is useful when you want to aggregate data from multiple sources or perform operations on all the values in the dictionaries.

To merge nested dictionaries, you can use the update() method. The update() method updates the dictionary with the key-value pairs from another dictionary. If the key already exists in the dictionary, the update() method overwrites the existing value with the new value.

Here’s an example of a merge_dicts function that merges two dictionaries:

def merge_dicts(dict1, dict2):
merged_dict = dict1.copy()
for key, value in dict2.items():
if key in merged_dict and isinstance(merged_dict[key], dict) and isinstance(value, dict):
merged_dict[key] = merge_dicts(merged_dict[key], value)
else:
merged_dict[key] = value
return merged_dict

For example, to merge the following nested dictionaries:

dict1 = {'a': {'b': 1, 'c': 2}, 'd': {'e': {'f': 3}}}
dict2 = {'a': {'b': 10, 'c': 20}, 'd': {'e': {'g': 4}}}

You can use the merge_dicts function:

merged_dict = merge_dicts(dict1, dict2)
print(merged_dict)

Output: {'a': {'b': 10, 'c': 20}, 'd': {'e': {'f': 3, 'g': 4}}}

Sorting Nested Lists and Dictionaries

Sorting a nested list or dictionary means arranging its elements or key-value pairs in a particular order. This is useful when you want to organize the data or perform operations that require the elements to be in a specific order.

To sort a nested list, you can use the sort() method or the sorted() function. The sort() method sorts the list in place, while the sorted() function returns a new sorted list.

For example, to sort the following nested list in descending order:

my_list = [[3, 4, 1, [2, 5, 6], [9, 7, 8]]

You can use the sorted() function:

sorted_list = sorted(my_list, key=lambda x: x[0], reverse=True) print(sorted_list)
Output: `[[9, 7, 8], [3, 4, 1], [2, 5, 6]]`
To sort a nested dictionary, you can use the sorted() function with the items() method. The items() method returns a list of key-value pairs, which can be sorted based on the key or value. For example, to sort the following nested dictionary based on the age in ascending order:
my_dict = {'first': {'name': 'John', 'age': 25}, 'second': {'name': 'Jane', 'age': 30}, 'third': {'name': 'Bob', 'age': 20}}
You can use the sorted() function with the items() method:

sorted_dict = dict(sorted(my_dict.items(), key=lambda x: x[1]['age'])) print(sorted_dict)

Output: `{'third': {'name': 'Bob', 'age': 20}, 'first': {'name': 'John', 'age': 25}, 'second': {'name': 'Jane', 'age': 30}}` 

Conclusion:

Handling advanced nested list and dictionary in Python 3 is essential for any programmer who deals with complex data structures. By mastering the techniques and operations we’ve covered in this article, you’ll be well on your way to becoming a Python 3 expert. Remember to access elements using multiple index operators, add and remove elements using the appropriate methods, modify elements by assigning new values, and use advanced operations such as flattening, merging, and sorting to organize and analyze your data. And don’t forget to use code examples to practice and reinforce your understanding of these concepts. Happy coding!

As a networking engineer, you may already be familiar with Jinja2, the powerful templating language for Python. Jinja2 is widely used in networking automation for generating configuration files, reports, and other outputs. In this article, we will explore some tips and tricks for using Jinja2 in networking automation, along with code examples that demonstrate how to put these techniques into practice.

Introduction to Jinja2

Jinja2 is a popular templating language for Python that allows you to generate text output based on templates. It is easy to use and provides powerful features such as conditional statements, loops, and filters. Jinja2 can be used for a variety of purposes, such as generating HTML, XML, JSON, or even plain text.

In networking automation, Jinja2 is used to generate configuration files for network devices such as routers, switches, and firewalls. With Jinja2, you can create templates that include variables, conditional statements, and loops to generate customized configuration files for different devices or scenarios.

Tip #1: Using Variables in Jinja2 Templates

One of the most powerful features of Jinja2 is the ability to use variables in templates. Variables allow you to create dynamic templates that can be customized based on different parameters. For example, you can define a variable for the hostname of a device, and then use that variable in a template to generate configuration files for different devices.

Here’s an example of how to define a variable in Jinja2:

{% set hostname = 'router1' %}

In this example, we define a variable called hostname and set its value to 'router1'. We can then use this variable in a template like this:

hostname {{ hostname }}

This will output hostname router1 when the template is rendered. You can also use variables in conditional statements and loops to generate more complex templates.

Tip #2: Using Conditional Statements in Jinja2 Templates

Conditional statements allow you to generate different output based on specific conditions. In networking automation, you can use conditional statements to generate configuration files for different devices or scenarios. For example, you can generate different configurations for routers and switches based on their role in the network.

Here’s an example of how to use conditional statements in Jinja2:

{% if device_type == 'router' %}
interface {{ interface }}
ip address {{ ip_address }}
{% elif device_type == 'switch' %}
interface {{ interface }}
switchport mode access
{% endif %}

In this example, we use the if statement to check the value of the device_type variable. If the value is 'router', we generate a configuration for a router interface with an IP address. If the value is 'switch', we generate a configuration for a switch interface in access mode.

Tip #3: Using Loops in Jinja2 Templates

Loops allow you to generate repetitive output based on a list or dictionary of values. In networking automation, you can use loops to generate configuration files for multiple interfaces, VLANs, or routes.

Here’s an example of how to use loops in Jinja2:

{% for interface in interfaces %}
interface {{ interface.name }}
ip address {{ interface.ip_address }}
{% endfor %}

In this example, we use the for loop to iterate over a list of interface objects. For each interface, we generate a configuration with its name and IP address.

Tip #4: Using Filters in Jinja2 Templates

Filters allow you to modify the output of variables or expressions in Jinja2. Filters can be used to format strings, convert data types, or apply other transformations


Here’s an example of how to use filters in Jinja2:

{{ interface.name | upper }}

In this example, we use the upper filter to convert the value of the interface.name variable to uppercase. This can be useful for formatting the output of variables or expressions.

Tip #5: Using Macros in Jinja2 Templates

Macros allow you to define reusable code snippets that can be used throughout your templates. Macros can be used to simplify complex templates, reduce redundancy, and improve readability.

Here’s an example of how to define a macro in Jinja2:

{% macro interface_config(interface) %}
interface {{ interface.name }}
ip address {{ interface.ip_address }}
{% endmacro %}

In this example, we define a macro called interface_config that takes an interface object as an argument. The macro generates a configuration for the interface with its name and IP address.

Code Examples

Now that we’ve covered some tips and tricks for using Jinja2 in networking automation, let’s look at some code examples that demonstrate how to put these techniques into practice.

Example 1: Generating Router Configurations

In this example, we use Jinja2 to generate configurations for multiple routers with different hostnames and IP addresses.


from jinja2 import Template

template = Template('''
hostname {{ hostname }}

interface {{ interface }}
ip address {{ ip_address }}
''')

routers = [
{'hostname': 'router1', 'interface': 'GigabitEthernet0/0', 'ip_address': '10.0.0.1/24'},
{'hostname': 'router2', 'interface': 'GigabitEthernet0/0', 'ip_address': '10.0.0.2/24'},
{'hostname': 'router3', 'interface': 'GigabitEthernet0/0', 'ip_address': '10.0.0.3/24'},
]

for router in routers:
config = template.render(hostname=router['hostname'], interface=router['interface'], ip_address=router['ip_address'])
print(config)


In this example, we define a Jinja2 template that includes variables for the hostname, interface, and IP address of a router. We then define a list of dictionaries that contain the values for these variables for each router.

We use a for loop to iterate over the list of routers and generate a configuration for each one using the render method of the Jinja2 template.

Example 2: Generating VLAN Configurations

In this example, we use Jinja2 to generate configurations for multiple VLANs with different names and IDs.


from jinja2 import Template

template = Template('''
vlan {{ vlan_id }}
name {{ vlan_name }}
''')

vlans = [
{'vlan_id': 10, 'vlan_name': 'Sales'},
{'vlan_id': 20, 'vlan_name': 'Marketing'},
{'vlan_id': 30, 'vlan_name': 'Engineering'},
]

for vlan in vlans:
config = template.render(vlan_id=vlan['vlan_id'], vlan_name=vlan['vlan_name'])
print(config)


In this example, we define a Jinja2 template that includes variables for the VLAN ID and name. We then define a list of dictionaries that contain the values for these variables for each VLAN.

We use a for loop to iterate over the list of VLANs and generate a configuration for each one using the render method of the Jinja2 template.

Conclusion

In this article, we’ve explored some tips and tricks for using Jinja2 in networking automation, including variables, conditional statements, loops, filters, and macros. We’ve also provided code examples that demonstrate how to use these techniques in practice.

By using Jinja2 in your networking automation projects, you can save time and reduce errors by automating the generation of configuration files and other outputs. With the tips and tricks we’ve covered in this article, you can take your Jinja2 skills to the next level and create more advanced templates for your networking automation projects.

FAQs

  1. What is Jinja2?

Jinja2 is a templating language for Python that allows you to generate text output based on templates.

  1. How is Jinja2 used in networking automation?

Jinja2 is used to generate configuration files for network devices such as routers, switches, and firewalls.

  1. What are some of the features of Jinja2?

Jinja2 provides powerful features such as variables, conditional statements, loops, filters, and macros.

  1. How can Jinja2 save time in networking automation projects?

By using Jinja2 to automate the generation of configuration files and other outputs, you can save time and reduce errors in your networking automation projects.

  1. Where can I learn more about Jinja2?

You can learn more about Jinja2 by reading the official documentation and by exploring code examples and tutorials online.

If you are a networking engineer, you know how complex it can be to manage a large-scale network. It is essential to automate certain tasks to save time and reduce the likelihood of errors. This is where Jinja2 comes in. Jinja2 is a powerful templating engine that allows you to generate configuration files, scripts, and reports with ease. In this article, we will cover some Jinja2 tips and tricks that can help you streamline your workflow and make your life as a networking engineer a little easier.

What is Jinja2?

Jinja2 is a Python-based templating engine that allows you to create dynamic templates for various purposes. It is widely used for web development, but it can also be used in other areas such as network automation. Jinja2 allows you to define templates that contain placeholders for variables, which are then replaced with actual values during runtime. This makes it easy to generate configuration files, scripts, and reports.

Tip #1: Use Jinja2 to Generate Configuration Files

One of the most common use cases for Jinja2 in networking is generating configuration files. Instead of manually configuring devices one by one, you can use Jinja2 to generate configuration files based on a template. This template can contain variables that are specific to each device, such as IP addresses, hostnames, and interface configurations. By using Jinja2, you can save time and reduce the likelihood of errors.

Tip #2: Use Jinja2 Filters for String Manipulation

Jinja2 filters are a powerful feature that allows you to manipulate strings in various ways. For example, you can use the ‘replace’ filter to replace a substring with another string. You can also use the ‘upper’ filter to convert a string to uppercase or the ‘lower’ filter to convert a string to lowercase. Jinja2 filters can be used in templates to transform variables before they are rendered.

Tip #3: Use Jinja2 Loops to Generate Multiple Configurations

Jinja2 loops allow you to generate multiple configurations based on a template. For example, if you have a list of devices that you want to configure, you can use a loop to generate a configuration file for each device. This can save you a lot of time and reduce the likelihood of errors.

Tip #4: Use Jinja2 Includes for Reusable Templates

Jinja2 includes allow you to reuse templates across multiple files. For example, you can create a template for interface configurations and include it in multiple configuration files. This can save you time and make it easier to maintain your templates.

Tip #5: Use Jinja2 Conditionals for Dynamic Configurations

Jinja2 conditionals allow you to create dynamic configurations based on certain conditions. For example, you can use a conditional to generate different configurations based on the type of device. This can be useful if you have multiple types of devices that require different configurations.

Tip #6: Use Jinja2 Macros for Reusable Code

Jinja2 macros allow you to define reusable blocks of code that can be used in multiple templates. For example, if you have a complex configuration that you use in multiple templates, you can define it as a macro and use it whenever you need it. This can save you time and make it easier to maintain your templates.

Tip #7: Use Jinja2 Variables for Dynamic Values

Jinja2 variables allow you to define dynamic values that can be used in your templates. For example, you can define a variable for the current date and time and use it in your templates. This can be useful for generating reports or log files that require timestamps.

Tip #8: Use Jinja2 Extensions for Custom Functionality

Jinja2 extensions allow you to add custom functionality to Jinja2. For example, you can add an extension to Jinja2 that allows you to perform calculations in your templates. This can be useful for generating reports that require complex calculations. There are many Jinja2 extensions available, and you can also create your own extensions if you need custom functionality.

Tip #9: Use Jinja2 Template Inheritance for Modular Templates

Jinja2 template inheritance allows you to create modular templates that can be extended by other templates. For example, you can create a base template that contains the common elements of your configurations, such as headers and footers, and then extend it with specific configurations for each device. This can make your templates easier to maintain and reduce the likelihood of errors.

Tip #10: Use Jinja2 to Generate Reports

Jinja2 can be used to generate reports in various formats, such as HTML, CSV, and JSON. For example, you can use Jinja2 to generate a report that shows the status of all devices in your network. By using Jinja2 to generate reports, you can save time and ensure that your reports are consistent and accurate.

Tip #11: Use Jinja2 to Generate Scripts

Jinja2 can also be used to generate scripts that can be used to automate tasks in your network. For example, you can use Jinja2 to generate a script that performs backups of all devices in your network. By using Jinja2 to generate scripts, you can save time and reduce the likelihood of errors.

Tip #12: Use Jinja2 with Network Automation Tools

Jinja2 can be used in conjunction with network automation tools such as Ansible and SaltStack. For example, you can use Jinja2 to generate configuration files for devices and then use Ansible to push those configurations to the devices. By using Jinja2 with network automation tools, you can streamline your workflow and make your network more efficient.

Tip #13: Use Jinja2 Debugging Tools

Jinja2 provides debugging tools that can help you identify errors in your templates. For example, you can use the ‘debug’ statement to output debugging information to the console. You can also use the ‘undefined’ statement to identify variables that have not been defined in your templates. By using Jinja2 debugging tools, you can save time and ensure that your templates are error-free.

Tip #14: Use Jinja2 with YAML for Configuration Management

Jinja2 can be used with YAML to manage configurations in your network. For example, you can use Jinja2 to generate YAML files that contain the configurations for your network devices. By using Jinja2 with YAML, you can make your configuration management more efficient and reduce the likelihood of errors.

Tip #15: Use Jinja2 with Python for Custom Functionality

Jinja2 can be used in conjunction with Python to add custom functionality to your templates. For example, you can use Python to perform complex calculations or generate random values in your templates. By using Jinja2 with Python, you can add powerful features to your templates and make them more flexible.

Conclusion

Jinja2 is a powerful tool for networking engineers that can help you streamline your workflow and save time. By using the tips and tricks outlined in this article, you can take advantage of the full potential of Jinja2 and make your life as a networking engineer a little easier.

Jinja2 is a powerful templating language used for creating dynamic web pages, configuration files, and scripts. It is a popular choice among networking engineers who use it for creating configuration templates for their network devices. In this article, we will discuss some tips and tricks for using Jinja2 effectively in networking environments.

Understanding Jinja2

Before we dive into the tips and tricks, let’s quickly go over what Jinja2 is and how it works. Jinja2 is a template engine that allows you to generate text output based on templates and variables. It uses a syntax similar to Python and has a lot of built-in functionality for handling variables, loops, conditions, and more.

In networking, Jinja2 is commonly used for creating configuration templates for devices like routers, switches, and firewalls. These templates can be used to automatically generate configurations for multiple devices, saving time and reducing the risk of errors.

Tip 1: Use Jinja2 for Modular Configuration

One of the most significant benefits of Jinja2 is its ability to create modular configuration templates. By breaking down your configuration into smaller, reusable components, you can create a more organized and flexible template. This makes it easier to maintain and modify your configuration over time.

For example, you can create a template for your OSPF configuration, which includes all of the necessary variables and settings. Then, you can include this template in your main configuration template, along with other templates for different components of your network.

Tip 2: Use Jinja2 for Custom Variables

Jinja2 also allows you to define your own custom variables, which can be used in your templates to make them more dynamic. This is particularly useful in networking, where you often need to create configurations for multiple devices with different settings.

For example, you can create a variable for the management IP address of your router and use it in your configuration template. Then, when you generate the configuration for each device, you can specify a different value for this variable, depending on the device’s IP address.

Tip 3: Use Jinja2 for Loops

Another useful feature of Jinja2 is its ability to handle loops. This allows you to generate configurations for multiple devices or interfaces quickly and easily.

For example, you can create a loop that generates a configuration block for each interface on your router, based on a list of interface names. This saves you from having to manually create a configuration block for each interface, which can be time-consuming and error-prone.

Tip 4: Use Jinja2 for Conditional Statements

Jinja2 also supports conditional statements, which can be used to generate different configurations based on specific conditions. This is particularly useful in networking, where you may need to create different configurations for different types of devices or interfaces.

For example, you can create a conditional statement that generates a different configuration block for a switch port, depending on whether it is an access port or a trunk port. This allows you to create more specific and targeted configurations for your devices.

Tip 5: Use Jinja2 for Debugging

Finally, Jinja2 can be a useful tool for debugging your configurations. By using Jinja2 to generate your configurations, you can easily see the output and debug any errors or issues.

For example, if you are having trouble with a particular configuration block, you can use Jinja2 to generate that block on its own, without generating the entire configuration. This makes it easier to isolate the problem and find a solution.

As a network engineer, you will often find yourself working with lists and dictionaries in your programming tasks. Python3 offers a wide range of functions and features that can make your work much easier and efficient. In this article, we will discuss some tips and tricks that will help you work with lists and dictionaries more effectively.

Table of Contents

  1. Introduction
  2. Working with Lists
    1. Creating a List
    2. Accessing List Elements
    3. Slicing Lists
    4. Modifying Lists
    5. List Comprehension
  3. Working with Dictionaries
    1. Creating a Dictionary
    2. Accessing Dictionary Elements
    3. Modifying Dictionaries
    4. Dictionary Comprehension
  4. Combining Lists and Dictionaries
    1. Merging Lists
    2. Merging Dictionaries
    3. Updating Dictionaries
  5. Conclusion
  6. FAQs

1. Introduction

Python is a popular programming language among network engineers because of its simplicity and readability. It is an easy-to-learn language that is widely used in network automation and configuration. Lists and dictionaries are fundamental data structures in Python3 that allow you to store and manipulate data. In this article, we will explore some tips and tricks that can help you work with lists and dictionaries more efficiently.

2. Working with Lists

2.1 Creating a List

To create a list, you can use square brackets and separate the items with commas. For example, to create a list of network devices, you can use the following code:

devices = ['router1', 'switch1', 'firewall1']

2.2 Accessing List Elements

To access elements of a list, you can use the index of the element inside square brackets. The index starts at 0 for the first element, 1 for the second, and so on. For example, to access the first element of the devices list created above, you can use the following code:

print(devices[0])

This will output router1.

2.3 Slicing Lists

You can also slice a list to extract a subset of its elements. To slice a list, you can use the colon (:) operator. For example, to extract the second and third elements of the devices list, you can use the following code:

print(devices[1:3])

This will output ['switch1', 'firewall1'].

2.4 Modifying Lists

You can modify a list by assigning a new value to one of its elements. For example, to change the first element of the devices list to router2, you can use the following code:

devices[0] = 'router2'

2.5 List Comprehension

List comprehension is a concise way of creating a new list based on an existing list. It allows you to apply a function or expression to each element of a list and create a new list with the results. For example, to create a list of the lengths of the elements in the devices list, you can use the following code:

lengths = [len(device) for device in devices]

This will create a new list with the lengths of each element in the devices list.

3. Working with Dictionaries

3.1 Creating a Dictionary

A dictionary is a collection of key-value pairs. To create a dictionary,

To create a dictionary, you can use curly braces and separate the key-value pairs with commas. For example, to create a dictionary of interface names and their IP addresses, you can use the following code:

interfaces = {'eth0': '10.0.0.1', 'eth1': '10.0.0.2', 'eth2': '10.0.0.3'}

3.2 Accessing Dictionary Elements

To access a value in a dictionary, you can use the corresponding key inside square brackets. For example, to access the IP address of the eth0 interface in the interfaces dictionary, you can use the following code:

print(interfaces['eth0'])

This will output 10.0.0.1.

3.3 Modifying Dictionaries

You can modify a dictionary by assigning a new value to one of its keys. For example, to change the IP address of the eth0 interface to 10.0.0.10, you can use the following code:

interfaces['eth0'] = '10.0.0.10'

3.4 Dictionary Comprehension

Similar to list comprehension, dictionary comprehension allows you to create a new dictionary based on an existing dictionary. It allows you to apply a function or expression to each key-value pair of a dictionary and create a new dictionary with the results. For example, to create a dictionary of interface names and their lengths in characters, you can use the following code:

lengths = {interface: len(interface) for interface in interfaces}

This will create a new dictionary with the lengths of each key in the interfaces dictionary.

4. Combining Lists and Dictionaries

4.1 Merging Lists

You can merge two or more lists into a single list using the + operator. For example, to merge the devices and interfaces lists created earlier, you can use the following code:

merged_list = devices + list(interfaces.keys())

This will create a new list with all the elements of the devices list and the keys of the interfaces dictionary.

4.2 Merging Dictionaries

You can merge two or more dictionaries into a single dictionary using the update() method. For example, to merge the interfaces and lengths dictionaries created earlier, you can use the following code:

interfaces.update(lengths)

This will add the key-value pairs of the lengths dictionary to the interfaces dictionary.

4.3 Updating Dictionaries

You can update the values of a dictionary using the update() method and a dictionary of key-value pairs. For example, to update the IP addresses of the interfaces dictionary to a new subnet 192.168.0.0/24, you can use the following code:

new_ips = {'eth0': '192.168.0.1', 'eth1': '192.168.0.2', 'eth2': '192.168.0.3'} interfaces.update(new_ips)

This will update the IP addresses of the interfaces dictionary with the new values.

5. Conclusion

In this article, we have discussed some tips and tricks for working with lists and dictionaries in Python3. We have covered creating lists and dictionaries, accessing their elements, modifying them, and using list and dictionary comprehension. We have also shown how to merge and update lists and dictionaries. By using these tips and tricks

effectively, you can save time and make your programming tasks more efficient.

6. FAQs

  1. What is a list in Python3? A list is a collection of ordered elements in Python3 that can be of different data types.
  2. How do I access the elements of a list in Python3? You can access the elements of a list by using their index inside square brackets.
  3. What is a dictionary in Python3? A dictionary is a collection of key-value pairs in Python3 that can be used to store and manipulate data.
  4. How do I access the values of a dictionary in Python3? You can access the values of a dictionary by using the corresponding key inside square brackets.
  5. What is list comprehension in Python3? List comprehension is a concise way of creating a new list based on an existing list by applying a function or expression to each element of the list.

In conclusion, working with lists and dictionaries is an essential part of network automation and configuration. By following the tips and tricks discussed in this article, you can make your programming tasks more efficient and save time. Remember to practice and experiment with these concepts to improve your Python3 skills.

As an optical network engineer, your work involves designing, building, and maintaining optical networks that transmit large amounts of data. With the increasing complexity of modern optical networks, it is important to have tools that can automate routine tasks, perform complex calculations, and visualize data. Python3 is a powerful programming language that can help you achieve these goals. In this article, we will explore some basic Python3 tips and tricks that can help you improve your workflow and make your work as an optical network engineer more efficient.

1. Getting started with Python3

Before you can start using Python3, you need to install it on your computer. Python3 is available for all major operating systems, including Windows, Mac OS, and Linux. You can download the latest version of Python3 from the official website (https://www.python.org/downloads/).

Once you have installed Python3, you can open a terminal or command prompt and type python3 to start the Python3 interpreter. The interpreter allows you to enter Python3 code directly and see the results immediately.

2. Using Python3 for data visualization

One of the key tasks of an optical network engineer is to visualize data. Python3 provides several libraries that can help you create powerful visualizations. One of the most popular libraries is Matplotlib. Matplotlib provides a wide range of plotting options, including line plots, scatter plots, and bar charts.

To use Matplotlib, you first need to install it using the following command:

pip3 install matplotlib

Once you have installed Matplotlib, you can import it in your Python3 script and start creating plots. Here is an example script that creates a line plot:

import matplotlib.pyplot as plt

x = [1, 2, 3, 4, 5]
y = [2, 4, 6, 8, 10]

plt.plot(x, y)
plt.xlabel('X-axis')
plt.ylabel('Y-axis')
plt.title('Line plot')
plt.show()

3. Automating routine tasks with Python3

As an optical network engineer, you often need to perform routine tasks, such as configuring devices or collecting data. Python3 can help you automate these tasks, saving you time and reducing the risk of errors.

To automate tasks with Python3, you first need to understand how to interact with devices and systems. Python3 provides several libraries that can help you achieve this, including Paramiko, Netmiko, and Napalm.

For example, here is a Python3 script that uses Netmiko to connect to a Cisco router and retrieve the running configuration:

from netmiko import ConnectHandler

device = {
'device_type': 'cisco_ios',
'ip': '192.168.1.1',
'username': 'admin',
'password': 'password',
}

with ConnectHandler(**device) as net_connect:
output = net_connect.send_command('show running-config')
print(output)

4. Debugging Python3 code

Debugging is an essential part of programming. Python3 provides several tools that can help you debug your code, including the built-in pdb module.

To use pdb, you can insert the following line of code at the point where you want to start debugging:

import pdb; pdb.set_trace()

5. Using Python3 for calculations

Optical network engineers often need to perform complex calculations, such as calculating fiber optic loss or calculating the bandwidth of a link.

Python3 provides several libraries that can help you perform these calculations, including NumPy and SciPy.

For example, here is a Python3 script that uses NumPy to calculate the average power of an optical signal:

import numpy as np

signal = np.array([1, 2, 3, 4, 5])
power = np.mean(signal**2)
print('Average power:', power)

6. Using Python3 for machine learning

Machine learning is an increasingly important tool for optical network engineers. Python3 provides several libraries that can help you implement machine learning algorithms, including TensorFlow and scikit-learn.

For example, here is a Python3 script that uses scikit-learn to train a simple linear regression model:

from sklearn.linear_model import LinearRegression

X = [[1], [2], [3], [4], [5]]
y = [2, 4, 6, 8, 10]

model = LinearRegression().fit(X, y)

print('Slope:', model.coef_)
print('Intercept:', model.intercept_)

7. Using Python3 for testing

Testing is an essential part of software development. Python3 provides several tools that can help you write and run tests, including the built-in unittest module and the popular pytest library.

For example, here is a Python3 script that uses pytest to test a simple function:

def add(x, y):
return x + y

def test_add():
assert add(2, 3) == 5
assert add(-1, 1) == 0

8. Writing Python3 scripts for automation

Once you have learned the basics of Python3, you can start writing scripts that automate your workflow. Here are some examples of tasks that you can automate with Python3:

  • Collecting data from network devices
  • Analyzing network performance data
  • Generating reports
  • Testing network configurations

Conclusion

In this article, we have explored some basic Python3 tips and tricks that can help optical network engineers improve their workflow and efficiency. We have covered topics such as data visualization, automation, debugging, calculations, machine learning, testing, and script writing. By using Python3, you can automate routine tasks, perform complex calculations, and visualize data in a powerful and flexible way.

FAQs

  1. Do I need to have programming experience to learn Python3 as an optical network engineer?
  • No, you can start learning Python3 as a beginner. There are many online resources and courses available that can help you get started.
  1. Is Python3 the only programming language that optical network engineers should learn?
  • No, there are many other programming languages that can be useful for optical network engineers, such as C, C++, Java, and Perl. However, Python3 is a popular and versatile language that is well-suited for many tasks in optical networking.
  1. Can Python3 be used for real-time network monitoring?
  • Yes, Python3 can be used for real-time network monitoring. There are several libraries available that can help you collect and analyze network data in real-time.
  1. Can Python3 be used for network security?
  • Yes, Python3 can be used for network security. There are several libraries available that can help you implement security measures, such as cryptography and SSL.
  1. Where can I find more resources to learn Python3 as an optical network engineer?
  • There are many online resources and courses available, such as Codecademy, Coursera, and Udemy. You can also find many tutorials and examples on websites like GitHub and Stack Overflow.

In this article, we will explore how to write a Python3 program that allows you to connect to and control an optical device using Telnet. The Telnet protocol is commonly used for remote access to devices such as routers, switches, and other network equipment. With Python3, you can create a program that uses the Telnet protocol to connect to an optical device and perform various operations.

Understanding the Basics of Telnet Protocol

Before we get started with writing a Python3 program to connect to an optical device via Telnet, it’s essential to understand the basics of the Telnet protocol. Telnet is a client-server protocol that enables users to connect to remote devices over the internet or a local network. The Telnet client sends commands to the server, which executes them and sends back the output to the client. Telnet is a text-based protocol that transmits data in plain text, making it easy to use for remote access and management of devices.

Setting Up Your Python Environment

The first step in writing a Python3 program for Telnet is to set up your Python environment. You will need to install Python3 on your computer if you haven’t already. You can download the latest version of Python3 from the official website. Once you have installed Python3, you can use a code editor of your choice to write and run Python code. Some popular code editors for Python include PyCharm, Visual Studio Code, and Sublime Text.

Installing the Telnet Library

To connect to an optical device using Telnet, you will need to use the Telnet library in Python. The Telnet library provides a set of functions that allow you to connect to a Telnet server, send commands, and receive output. You can install the Telnet library in Python using pip, the package installer for Python. Open your terminal or command prompt and run the following command:

/* pip install telnetlib */

This command installs the Telnet library in your Python environment, making it available for use in your Python program.

Writing the Python3 Program for Telnet

Now that you have set up your Python environment and installed the Telnet library, you can start writing your Python3 program for Telnet. The following code demonstrates a simple Python3 program that connects to an optical device using Telnet, sends a command to the device, and receives the output:

import telnetlib

HOST = "192.168.1.1"
user = "admin"
password = "password"

tn = telnetlib.Telnet(HOST)

tn.read_until(b"Username: ")
tn.write(user.encode('ascii') + b"\n")
tn.read_until(b"Password: ")
tn.write(password.encode('ascii') + b"\n")

tn.write(b"show interfaces\n")
output = tn.read_all().decode('ascii')

print(output)

In this code, we first import the Telnet library in Python. We then define the IP address of the optical device we want to connect to, along with the username and password for authentication. We create a Telnet object using the Telnet function from the Telnet library and connect to the device using the IP address. We then send the username and password to the device using the Telnet write function, followed by the command we want to execute (in this case, “show interfaces”). We then read the output from the device using the Telnet read_all function and decode it to ASCII format before printing it to the console.

Adding Error Handling to Your Program

When writing a Python3 program for Telnet, it’s essential to include error handling to handle potential errors and exceptions that may occur during execution. One way to handle errors is to use the try-except block in Python. The try block contains the code that may raise an exception, and the except block contains the code that handles the exception.

Here is an example of how to use the try-except block to handle exceptions in your Python3 program for Telnet:

import telnetlib

HOST = "192.168.1.1"
user = "admin"
password = "password"

try:
tn = telnetlib.Telnet(HOST)

tn.read_until(b"Username: ")
tn.write(user.encode('ascii') + b"\n")
tn.read_until(b"Password: ")
tn.write(password.encode('ascii') + b"\n")

tn.write(b"show interfaces\n")
output = tn.read_all().decode('ascii')

print(output)
except Exception as e:
print("Error: ", e)
finally:
tn.close()

In this code, we have added a try block that contains the code that may raise an exception. We have also added an except block that prints the error message if an exception occurs during execution. We have also added a finally block that closes the Telnet connection after execution, regardless of whether an exception occurs or not.

Conclusion

In conclusion, writing a Python3 program to Telnet an optical device is a straightforward process that can be achieved by following the steps outlined in this article. Understanding the basics of the Telnet protocol, setting up your Python environment, installing the Telnet library, and adding error handling to your program are essential steps that will ensure the success of your program. With the knowledge and skills gained from this article, you can create powerful Python3 programs that control and manage various devices using the Telnet protocol.

FAQs

  1. What is the Telnet protocol, and how does it work?
  • The Telnet protocol is a client-server protocol that enables users to connect to remote devices over the internet or a local network. The Telnet client sends commands to the server, which executes them and sends back the output to the client.
  1. What is Python3, and why is it useful for Telnet programming?
  • Python3 is a high-level programming language that is widely used in various applications, including Telnet programming. Python3 provides a set of functions and libraries that make it easy to connect to remote devices using the Telnet protocol.
  1. What are some popular code editors for Python programming?
  • Some popular code editors for Python programming include PyCharm, Visual Studio Code, and Sublime Text.
  1. What is error handling in Python, and why is it essential for Telnet programming?
  • Error handling in Python refers to the process of anticipating, detecting, and resolving errors that may occur during program execution. Error handling is essential for Telnet programming because it helps to ensure the program’s stability and reliability.
  1. How can I improve my Telnet programming skills in Python?
  • To improve your Telnet programming skills in Python, you can practice writing programs that connect to various devices using the Telnet protocol. You can also read documentation and tutorials on Telnet programming in Python to gain more knowledge and skills.


Both composite power and per channel power are important indicators of the quality and stability of an optical link, and they are used to optimize link performance and minimize system impairments.

Composite Power Vs Per Channel power for OSNR calculation.

When it comes to optical networks, one of the most critical parameters to consider is the OSNR or Optical Signal-to-Noise Ratio. It measures the signal quality of the optical link, which is essential to ensure proper transmission. The OSNR is affected by different factors, including composite power and per channel power. In this article, we will discuss in detail the difference between these two power measurements and how they affect the OSNR calculation.

What is Composite Power?

Composite power refers to the total power of all the channels transmitted in the optical network. It is the sum of the powers of all the individual channels combined including both the desired signal and any noise or interference.. The composite power is measured using an optical power meter that can measure the total power of the entire signal.

What is Per Channel Power?

Per channel power refers to the power of each channel transmitted in the optical network. It is the individual power of each channel in the network. It provides information on the power distribution among the different channels and can help identify any channel-specific performance issues.The per channel power is measured using an optical spectrum analyzer that can measure the power of each channel separately.

Difference between Composite Power and Per Channel Power

The difference between composite power and per channel power is crucial when it comes to OSNR calculation. The OSNR calculation is affected by both composite power and per channel power. The composite power determines the total power of the signal, while the per channel power determines the power of each channel.

In general, the OSNR is directly proportional to the composite power and inversely proportional to the per channel power. This means that as the composite power increases, the OSNR also increases. On the other hand, as the per channel power decreases, the OSNR decreases.

The reason for this is that the noise in the system is mostly generated by the amplifiers used to boost the signal power. As the per channel power decreases, the signal-to-noise ratio decreases, which affects the overall OSNR.

OSNR measures the quality of an optical signal by comparing the power of the desired signal to the power of any background noise or interference within the same bandwidth. A higher OSNR value indicates a better signal quality, with less noise and interference.

Q factor, on the other hand, measures the stability of an optical signal and is related to the linewidth of the optical source. A higher Q factor indicates a more stable and coherent signal.

To calculate OSNR using per-channel power, you would measure the power of the signal and the noise in each individual channel and then calculate the OSNR for each channel. The OSNR for the entire system would be the average OSNR across all channels.

In general, using per-channel power to calculate OSNR is more accurate, as it takes into account the variations in signal and noise power across the spectrum. However, measuring per-channel power can be more time-consuming and complex than measuring composite power.

Analysis

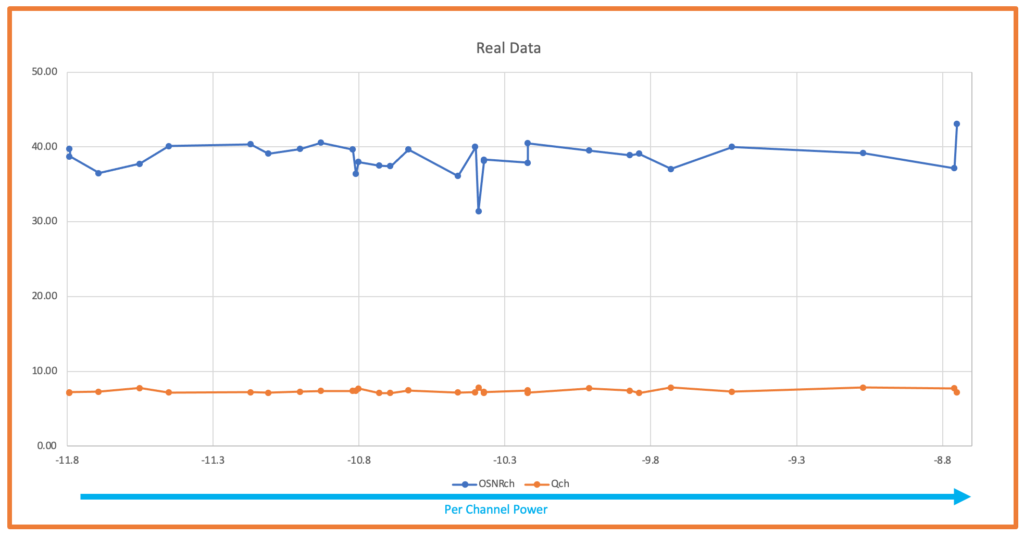
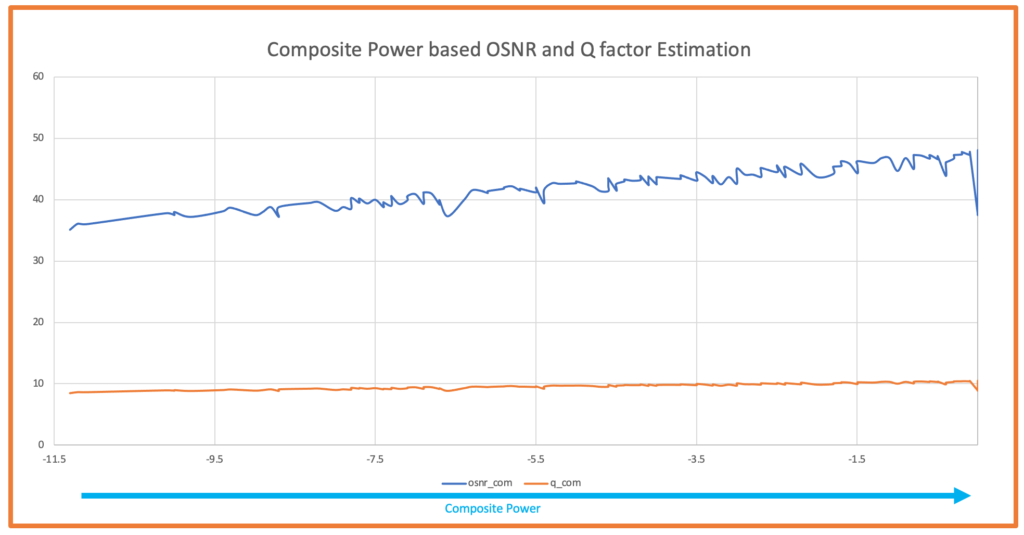
Following charts are used to deduce the understanding:-

Collected from Real device for Reference

Calculated OSNR and Q factor based on Per Channel Power.

Calculated OSNR and Q factor based on composite Power.

Calculated OSNR and Q factor based on Per Channel Power.

Calculated OSNR and Q factor based on composite Power.

Formulas used for calculation of OSNR, BER and Q factor


Useful Python Script 

import math
def calc_osnr(span_loss, composite_power, noise_figure, spans_count,channel_count):
"""
Calculates the OSNR for a given span loss, power per channel, noise figure, and number of spans.

Parameters:
span_loss (float): Span loss of each span (in dB).
composite_power (float): Composite power from amplifier (in dBm).
noise_figure (float): The noise figure of the amplifiers (in dB).
spans_count (int): The total number of spans.
channel_count (int): The total number of active channels.

Returns:
The OSNR (in dB).
"""
total_loss = span_loss+10*math.log10(spans_count) # total loss in all spans
power_per_channel = composite_power-10 * math.log10(channel_count) # add power from all channels and spans
noise_power = -58 + noise_figure # calculate thermal noise power
signal_power = power_per_channel - total_loss # calculate signal power
osnr = signal_power - noise_power # calculate OSNR
return osnr


osnr = calc_osnr(span_loss=23.8, composite_power=23.8, noise_figure=6, spans_count=3,channel_count=96)
if osnr > 8:
ber = 10* math.pow(10,10.7-1.45*osnr)
qfactor = -0.41667 + math.sqrt(-1.9688 - 2.0833* math.log10(ber)) # calculate OSNR
else:
ber = "Invalid OSNR,can't estimate BER"
qfactor="Invalid OSNR,can't estimate Qfactor"

result=[{"estimated_osnr":osnr},{"estimated_ber":ber},{"estimated_qfactor":qfactor}]
print(result)

Above program can be tested by using exact code at link.

automationAutomation in Optical Networking

If you are reading this you can do this!!!

Google , ChatGPT, Stackoverflow and your little efforts will do it.No worries!!!


This article is not for professional automation engineer but for the enthusiastic professionals who just want to start but  need some guidance to do .


This article is purely  written on the basis of my personal experience through out my career and the intention involved  is to help my friend and folks in understanding the basics and get a glimpse of automation in networking world , so that they can feel motivated and don’t get scared with jargons used for automations.

In my terms:

***Automation is not replacing jobs but enabling you to live life more efficiently and with freedom.It is just an act of kindness by technology to give back to the its users and the creators.***

The scale with which networking communication devices and its usage is  increasing, we need lot of network bandwidth and automation in place to operate, configure, predict  and manage it.Also to have a more robust  ,scalable and reliable network we need agnostic and low latency automations that can help grow the network .

Why automation is needed? Out of 1 million reasons few are as:-

  • It will make your life simpler and cheerful from monotonous and boring pieces of job.
  • It will give you time to think something more creative .
  • It will give you more flexibility as automation can be enabled or operable from remote places.
  • You can spend more time with your loved ones .
  • It can give you sense of security and confidence.
  • It can lead you to be a successful entrepreneurship  .
  • It improves efficiency and reduces errors that can be made by human.

What are the things you can automate? Out of 1 billion reasons few are as:-

  • Everything that you do is sooner or later can be potentially automated.
  • Device logins and configurations can be automated.
  • Metrics polling can be automated to fetch some values from device.
  • Network Management can be customised or scaled.
  • Encryption key rotation can be automated.
  • Capacity monitoring , planning or network design could be automated.
  • Fault Alarming can be automated.
  • Link routing and restoration can be automated.
  • Network self healing and fault remediation could be achieved.
  • Reporting and metrics evaluation could be achieved.
  • Multiple cronjobs could be done and automated.
  • Network discovery could be automated.
  • Regression steps can be automated.
  • On weekends, device/feature runs based testing tasks can be automated.

*This is just an idea that whatever you are doing in your routine job being and network engineer, almost everything can be automated.


Now the most important question:


WHAT YOU NEED TO DO?

*THINK THAT YOU CAN DO IT.


We are blessed to have all the resources that we need to learn and groom ourself at this point of time which are available free of cost. So, even if you don’t know how to start and you have never done or written any automation till now in your career still you can do with just a believe that “YOU CAN DO IT”.


*RECALL THE DAYS WHEN YOU LEARED TO EARNED


WE  all have studied at some point of time from books ,newspapers, magazines ,videos etc and have achieved some benchmark in life.So at this point of time too with just a small efforts you can learn and enhance your skill using few of the greatest tools that are available free of cost which I personally recommend are:-

  • GOOGLE  : The best piece of technology platform  that a human kind have .(will recommend first to search “how to search in google search in a best way”
  • Stackoverflow  : Best spot to shadow programmers and learn new things.
  • w3schools.com  : Online school with playground to play.
  • Booksc  : The heaven for book lovers .free to download.

*ANY LANGUAGE WILL HELP BUT CHOOSE LATEST AND IN DEMAND


Automation  just needs an idea—>Steps to do it ——>ALGORITHM——> and any automation language will do it.


Never think that Automation is something which is so big that you can do it but always look for the simplest thing which you can automate and that’s the best way to start writing any automation.AUTOMATION is collection of SCRIPTS,TOOLS,PACKAGES,LIBRARIES organised in a efficient manner to collaborate and give some user consumable or readable data.

  • AUTOMATION LANGUAGES/TOOLS THAT CAN HELP NETWORK ENGINEERS
  • Python
  • TCL/Perl
  • HTML/JINJA/ANSIBLE
  • JAVA
  • NETCONF/YAML
  • SNMP/TL1/TELEMETRY /CLI
  • LINUX
  • TELNET/SSH
  • FTP/SFTP/WINSCP
  • KIBANA/GRFANA/DATABASE
  • PYCHARM/VISUAL STUDIO/SUBLIME TEXT/NOTEPAD++

Note: Do search in internet the terms if you are not aware so that you can learn more.